

About
About
Bill the Sky Guy
One person’s journey through amateur astronomy
About
About
Bill the Sky Guy
One person’s journey through amateur astronomy

One of my passions is showing off the wonders of the sky to people who are interested but have never really been able to see it, beyond what they can do with just their eyes.
It all started when...
As long as I can remember I have always been interested in space, space exploration, and science in general. As a child of the 1960s this was easy to do since this was the moonshot era and space news, astronomical discoveries being made (now that we were a spacefaring species) were in abundance, not that I really had any context about it all at that point–it was just cool.
One year around 1965 my parents gave me the Larousse Encyclopedia of Astronomy for Christmas and at 360 or so oversize pages it was by far the biggest book this seven year-old had ever seen. Nevertheless I was fascinated by the pictures and their descriptions and the whole experience started my mind thinking along logical/scientific lines in basic ways at an early age, something that has been truly beneficial for me all throughout my life.
Fast forward forty plus years and I look back at that book and realize I was looking at 360 pages of mostly "We don't know"! What's Jupiter made of? "We think hydrogen mostly but we don't know". What's the surface of Mars look like? "We don't know". They had a picture of Mars in the book with the caption: The best photo of Mars ever taken… It looked only slightly better than a pic you could take today by holding your iPhone up to the eyepiece of a 10" telescope!
Career History
So with all this early science fascination I became a professional astronomer, scientist or astrophysicist, right?
Wrong…
In fifth grade you had to start taking music classes or sing in the choir (God forbid) so they handed me a trombone. It wasn't love at first sight or anything but I had some great teachers in junior high school and above and really started getting fired up about music in seventh grade or so, eventually going on to graduate college with a bachelors degree in trombone performance, which I'm pretty sure is the world's least sought-after diploma. (I'm convinced now that when they hand you that thing in fifth grade there should be an issued disclaimer in the instrument case: "Kid, you're gonna like this, like it a lot! But don't end up liking it too much, it's just going to end badly for you…")
Somewhere along the way through college I became aware that a career of nothing but trombone playing was going to be a rather spartan existence (Quick: name a trombone player… See?) and found that learning recording engineering would be a nice confluence of music arts and electronics and would have a reasonable chance of earning me a living if I was good enough. So I became a music producer which I still do here in Hilton Head although the nature of the business is quite different than it was in the 80s and 90s.
Scope In
I had a telescope when I was a kid, it was from that hallmark company of scientific instrumentation: Sears! It was just over two inches in diameter (a classic design for cheap scopes) on a shaky wood mount and came with two overpowered eyepieces (a typical bad decision of scope manufacturers of the day so they could advertise "high power" which is actually useless on a shaky, unguided mount) but nevertheless I found a way to view some things from the driveway, mostly the Moon, planets and bright stars since I didn't know what else I could see or where to find it. I saw some good lunar eclipses over the years and always had a passion for trying to take pictures of things through the scope, once getting a decent shot of some sunspots by holding my Instamatic film camera up to the eyepiece (with a solar filter in place of course) which went in a newsletter I made (circulation: 3) which I realize now was an early precursor to my fascination with desktop publishing and astrophotography.
I wasn't a fiend for observing back then but as I got older I never completely lost touch with it either even having my Mom ship me the same, now twenty year old Sears scope to me for Halley's comet in 1986. Well it didn't take me very long to realize I was ready for something better now that I was an adult and five years out of college.
I found one rather quickly as luck would have it and still have the same scope today (more or less) 30 years later, the complete story of which I tell on the next page down because I think the story is educational as to the kind of gear that's out there to buy and what it's good for.
After having the new scope a year or so my friend and mentor Mike Perry and I joined an astronomical society and I eventually started publishing their newsletter which I did for about eleven years; the circulation was up in the hundreds now instead of three! I found out that you could do these Astronomical League (A.L.) sanctioned observing projects and took about a year to observe the complete 110 object Messier Catalog which to this day is pretty much the "Top 100" things to see with amateur telescopes. You had to keep a log book and do a little sketch of each object and then send your notes in for evaluation and if you passed you got a certificate and a little pin for your hat or tie or wherever. I highly recommend doing this kind of project because it will force you into areas of the sky you're not already familiar with and that really extends your learning.
Channeling my inner Carl Sagan
As it turns out, when you're in an astronomy club you end up hosting events for the public through “open houses” and public stargazes on "National Astronomy Day" and such to provide a public service and recruit new members. My background in music performance made me comfortable in these public situations and I discovered I had a talent for making hard-to-understand things understandable and talking about the sky with a good balance of nuts-and-bolts science info sprinkled with just enough "awe and wonder" to keep it interesting.
Over the years I was able to get a good handle on what kinds of things would make people say "Oh my God!" when they look through the eyepiece and use that knowledge when I pick objects to look at today at my stargazes also keeping in mind at least half of the people there have never looked through a telescope before and certainly can't observe with any level of detail until they get a little time in at the eyepiece.
Recent History
In 2015 at the age of 58 I decided to make a "pretend retirement" maneuver and relocate from Cincinnati to the Hilton Head area where, at least in theory, I could play golf year 'round!
Along with that I was pondering which of my marketable skills would be fun to pursue down here. I was able to wrangle an introduction to Greg Shumaker, the assistant activities director at Marriott VacationClub SurfWatch resort who had a science background in college and was eager to start up a weekly stargaze for their guests, with the Marriott being committed to providing a great experience for their owners beyond giving them a place to stay for the week.
Well the program has been met with extremely favorable comments with some people saying it was the highlight of their trip! I find that very gratifying and the stargazes became so popular during the busy summer months that the Marriott went out and purchased a second telescope so people wouldn't have to wait so long for their turn at the eyepiece. In addition other Marriotts got wind of the event and pretty soon I was doing stargazes 3-days a week!
I eventually came to the decision that I needed to "brand myself" and after doing a little 'crowd-sourcing' on Facebook ended up with "Bill the Sky Guy" fan page where I could interact with my guests, both current and past.
This website was created because I would be asked many of the same questions regarding getting started in this hobby or how to better use equipment people already had, what's good to look at in the sky etc. so I decided to write down pretty much everything I know about telescopes, observing best-practices and the like in a central place where people who are just getting going with astronomy can go to get a boost of knowledge or contact me directly with a question or comment.
I also was going to be needing a place to display my astrophotos as I started to get the hang of that.
Please have a look around and would love to hear your comments about what you think should be included in a site like this.
To borrow the famous tag line from Jack Horkheimer, "Keep Looking Up"…
Bill Gwynne
aka "Bill the Sky Guy"
Hilton Head Island
August, 2020
Bill the Sky Guy's Scope
My Scope
Bill the Sky Guy's Scope
My Scope
My Scope, Then and Now

Edmund Scientific 8" Newtonian Reflector Scope in its original configuration.
Here's the details of my setup through the end of 2016 and how it got that way over the past thirty years. I present it here as a look into the process of picking one's equipment so I'll talk about each scope 'system' and why I chose that particular piece and whether I'm happy with my purchase or not and things you might want to know before buying one of the items here for your own setup. I have included as many links to outside sources of additional information as I can think of in case you want a more thorough explanation or just want to dig deeper.
You'll also come to understand what a strange conglomeration of stuff you can end up with when you “heavily accessorize” over a few decades!
Details of my current setup are at the bottom of this page
Pre-Telescopic Era
Back in 1986 I met a guy named Mike Perry, a musician/computer programmer (you'd be surprised how common that is) who was the first real “amateur astronomer” I'd ever run into. I'd always been into the sky and had my Sears 2-inch refractor scope since I was a kid but I'd never really been able to find good sources of information about equipment that was above the toy/junk level that I had, but below the kind of stuff you'd see in the magazines for thousands of dollars.
Mike had a modest 6” in diameter scope, unmotorized but mounted equatorially with a knob you could turn with your fingers to compensate for the Earth's rotation when what you were working at rotated out of view. He helped me figure out what to look for equipment-wise and when I saw the kinds of things in the sky you could see with a decent scope I decided I needed a real instrument so I began scouring the local classified paper in search of something affordable that was “not junk".
Velvis
After wading though several weeks of Bushnell 2 1/4” refracto-garbage scope ads, sometime in early summer of 1986 I ran across an ad that read, “Edmund Scientific 8-inch Newtonian Reflector Telescope, photography ready $400”. This had had the ‘ring of truth’ to it and I was pretty sure this scope was different from all the others and I'd be buying it as soon as possible. Unfortunately the guy's work schedule didn't permit us to get together for several days but he said he'd hold it for me since I was the first call on the ad. The day finally arrived and he had the scope set up in his living room which also had a gigantic Velvet Elvis hanging on the wall! I flashed back to that song, “One of these things is not like the other, one of these things just doesn't belong…” but I digress.
One look told me this was the real deal and it took every bit of nerve I had to not just throw the $400 at him, grab the scope and run before he came to his senses. But I let him walk me through it all and it seemed solid enough. The mount was a little strange and he gave me some tips as to how it all went together.
So I got it home and took stock of it all. Good things: He had full manufacturers documentation including receipts saying that he had spent nearly $2000 on this scope, a full set of hex adjustment wrenches, power supply, joystick for guiding, extra felt pads, thumbscrews and the like. It also had an expensive factory add-on: an off-axis guider built into the main focuser. This is a focusing assembly that uses a“pickoff mirror” to siphon a bit of the incoming light off to a second eyepiece with illuminated crosshairs in it (called a reticle eyepiece) so you can center an object in there, and adjust the joystick to keep it there for long exposure photography, which at this time was still film based.
Not so good things: only one eyepiece, a rather cheap 28mm RKE (Rank-Kellner) design. There were some other lurking “not so good things” but they didn’t make themselves known to me until I became more skilled and ran into the limitations imposed on me by the mount.

Eyepieces of the "Plossl" design; 1.25" in diameter
Let the Accessorizing Begin
So the primary agenda was to get this thing as useful as possible for visual observing; I’d worry about photography later. I needed at least a couple of eyepieces of differing powers, and at Mike’s recommendation chose the Meade 4000 Super Plössl series; a 32mm and a 15mm, which for my scope represented low and medium power and were affordable, about $65 each in 1986. The way you determine magnification (power or ‘x’) on a scope is to take the focal length of the tube (usually printed on there) and divide by the mm of the eyepiece. So my new scope was 1050mm raw focal length, divide that by 32mm and you get 32.8 power (which I rounded up in my mind to 33x) and the 15mm yielded 70x. The 28mm that came with the scope was 37.5x but I almost never used it since it was so close to the 32mm.I also added a barlow lens which is a tube with a single lens in it that will double or triple your magnification. It goes in-between the eyepiece and the telescope focuser. It was about $95 and I got one that was adjustable between 2x and 3x power boost giving me effectively two new eyepieces!
My new 32mm eyepiece could now be 99x and with a nice big piece of glass to look through which is important if you wear glasses all the time like I do. Better yet, the the 15mm became 210x which is about as much as you want to push an 8-inch diameter scope before the image starts looking pretty smeary. This would be the closest view for planets while the lowest power views were good for open star clusters, galaxies, and the larger nebulae you look at. Power is over-hyped by scope advertisers for the most part although this is changing amongst the reputable manufacturers. If you see a scope that seems to be touting“high power” views up to 400x or around there but costs less than $500 you can be certain it’s garbage.
I also bought a filter for seeing emission nebula since I lived in Cincinnati and light pollution was a persistent problem. I chose the Lumicon UHC (Ultra High Contrast) Premium filter for $119. These filters rely on the the fact that light from most nebula is created by a certain physical process which results in their light emissions being confined to a few very specific light frequencies which this filter preferentially lets through and blocks pretty much everything else. I could have bought an“Oxygen III” (O3) filter which does essentially the same thing but the UHC seemed to be a little more flexible so I threw an extra Hamilton down to get it.
I also needed red flashlights, an accessories carrying case, and some sky charts which were 33 sheets of 20”x24” paper charts, white on black, and I needed them laminated because they would be out in the cold, dewey night air and you know what happens to wet paper… Remember that laptop computers didn’t exist at all in 1986 and paper charts on a table were the way to go back then. I don’t know if you’re keeping track or not but I think that’s about as much on accessories as I spent on the whole scope in the first place, a trend that would continue for, well forever!
Honeymoon Phase
As I put the scope into service a few things became apparent: The main mirror on the scope was exceptionally well made (also known as“figured”) for a hobbyist level scope like this, and that was great news. About this same time Mike bought a Meade LX-200 10-inch scope for $2000 and he would often say he liked my image better! If there’s one thing you need to be right, it’s the mirror.
On the negative side I decided I hated my finder scope. The crosshairs on the eyepiece were so thin you couldn’t really see them, and it was image reversed due to the mirror in the diagonal that the eyepiece went into. This meant that everything was backwards compared to the charts–East was West, Left was Right and it was a real pain to reconcile your chart against the sky and move from object to object when you would try and find something.
Remember, this was waaaaay before telescopes that could point themselves were on the market for amateurs except at the priciest levels. So the way you would find things was to star-hop from bright objects that you can see to progressively dimmer ones until your scope was pointed at that dim thing that you could only see through the full scope. Well this was really difficult when everything was backwards and I really didn’t know the sky all that well at this time anyway.
So I bought an image-correct finder scope (about $80) and figured out how to mount it on the scope which required drilling a few new holes in the tube. This made a huge difference in being able to reconcile the chart against the sky and I then started to get good at tracking down those“faint fuzzies” eventually completing my Messier Certificate for viewing all 110 Messier Catalog objects.
Phase II
That was about how my scope stayed for five years or so. Mostly I was doing skill building work; learning the sky, keeping track of interesting things to look at and remembering how to find them.

I did get a foothold on astrophotography by buying a completely manual film camera and an illuminated reticle eyepiece which is a fairly high power (12.5mm) eyepiece with a red LED inserted into the side which illuminates two pairs of crosshairs that intersect at a 90° angle forming a box in the middle.
The idea is that if you center something in the box, open the camera shutter and then use the mount’s joystick control to carefully adjust the mount to compensate for errors in the drive gears giving you a perfectly centered image without smearing–in theory. The problem is that when it comes to long exposure astrophotography there is one thing that has to be just about perfect before you can be truly successful and that is “polar aligning” your mount.
Polar (Alignment) is a Bear
The mount that came with the scope was an“equatorial” design which is theoretically good for photography. One axis of the mount points at the North Celestial Pole (just a fraction away from the North Star, 'Polaris') and the other is for travel in East and West. The motor on the scope that compensates for the Earth’s rotation is moving the scope east and the north/south axes are perpendicular to that so everything’s easy right? Well no…
Accurate polar alignment depends on a lot of things, all of which build on top of one another. The first thing is the mount has to be level; like ‘bubble level accurate’ level. My mount had no way to adjust the height of one leg so you had to prop it up on whatever was handy which was never exactly the right height for that particular location and made the mount much less stable than if it had been sitting on the ground instead of a rock or piece of wood!

This is what happens if you point a camera at the North Star & leave the shutter open for an hour!
Moving the mount east/west on the ground was difficult too; there were no fine controls, you just had to pick it up slightly and turn it (which is a problem if you have one of the legs propped up on something already for leveling, or kick the legs–hardly a precise adjustment.
So I made a number of photographic attempts with this setup knowing that I never even really got very close to perfect alignment but somehow managed to get a couple of not really ‘good’ but at least ‘encouraging’ photographs out of it; one of M51 the Whirlpool Galaxy and the other of the Double Cluster in Perseus which are still up on my wall in the ‘remember when?’ area. Sometimes you have to just go and fail to more precisely see what you’re up against.
If You Can’t Go-To, Then at Least Push-To
By now (1992) I was starting to see some of the computerized mount prices starting to come down as new models appeared so there was hope, but still way out of my hobby budget. I began to see something that might at least allow me to find objects ‘by the numbers’ instead of star-hopping which is a great aid when you’re doing stargazes for the public which was something I was beginning to enjoy doing a lot.
I contacted a company called Jim’s Mobile because I noticed that they made a box that, with proper input from encoders on each of the N/S E/W axes on the mount would tell you were pointed in the sky after you told it where you were on the Earth using Longitude and Latitude and telling it what day and time it was.
Problem was, they didn’t make an installation kit for my (now pretty ancient) mount but I asked them if there was something that could be done. They said they’d see what they could do and asked me to take a bunch of photos of certain specific places on my mount and they would craft a plan if possible. A week after getting them the photos they called and said that they thought they could help me out, but I needed to send them this one particular adjustment knob from the mount so they could attach something to it which I did.
So Jim’s sent back my knob, a couple of encoders with mounting brackets, modular telephone cablesand pulley belts, plus their NGC-MAX box along with instructions on how to attach the encoders properly and all that. I’m not super good with this kind of thing and I knew that this was a ‘get it right the first time or you’re really screwed” kinda situation so I went to the local family owned garage and showed them what was up and they said ‘Piece of cake!”. When they saw the mount for the first time their comment was something like, “I want to see the gun that goes in that!” This was Kentucky after all…
So the way this system worked was that you entered some baseline data like the date and time, what longitude and latitude you were at and then you chose a couple alignment stars from a special list and manually tracked them down, hitting the “ALIGN” button when each was perfectly centered in the crosshair reticle eyepiece.
After completing this you could choose an object you wanted to view from the list and it would give you a “countdown” display in both the N/S and E/W axes as you manually moved the telescope in the correct direction. When the display read “0.0 – 0.0” you were pointed at what you wanted to view. Nifty! This was my standard setup until about 2006.
My deepest thanks to Jim’s Mobile for taking the time to craft a custom solution for me on this one; it’s hard to find people who will put themselves out for customers these days.

Celestron CG-5 GoTo Telescope Mount
Mounting An Assault
By 2006 I was starting to be really frustrated with the mount; it was proving to be a real barrier to progress. The 'push-to’ NGC-MAX thing was great except sometimes the belts would slip because of the dew on them and you’d be off-target when it said things should be in the center. That plus the basic mechanical adjustment deficiencies described earlier meant that it was really time to look into a better mount with real GoTo capability. I was still wanting to take photos of star clusters and galaxies; twenty years had passed and I had very little to show for it!
2004 saw the release of the Celestron CG-5 Advanced GT mount using their standard NexStar hand controller. I watched as the reviews came in, and checked that I could make it work with a scope that was never really meant to be mounted on there. I found out that there is a standard “dovetail bar” that fits into practically all the mounts you can buy separate from a scope; all you have to figure out is how to get your scope attached to the bar and you should be good. So I ordered one of these mounts for about $700. To mount my scope I bought a couple of hinged rings that would close around the scope tube, tighten with turnbuckles and then screwed them to the dovetail bar which would clamp into a channel on the mount.
Balance is very important on a GoTo setup and the dovetail bar and scope ring setup allows you to slide the whole thing around until there’s a nice equilibrium to the whole assembly. The motors on these things are really not all that powerful, just accurate, so good balance is essential for precise pointing.
My first night out with the new rig was less than ‘stellar’ (ar ar) though. The mount ships with an eleven pound counterweight which is about right for the very compact 8 and 10-inch Schmidt-Cassegrain design scopes Celestron was figuring would go on there, not some 40 inch long Newtonian tube. My initial attempts at getting the mount to find things automatically was very disappointing especially considering the “sweat equity” I had invested in getting my scope on there in the first place. Not only weren’t the desired objects in the eyepiece field like they were supposed to be they weren’t even nearby so I knew there was something wrong since everybody online said that this thing was pretty good about pointing accuracy.
I did a little more reading and discovered that I probably didn’t have enough counterweights for the load I was placing it under so a quick trip to that bastion of astronomical hardware accessories Dick’s Sporting Goods(!) had me coming home with 10, 5, & 2.5 lb dumbbell weights and I started experimenting with various combinations and found that adding 15 lbs to the stock 11 pound weight produced a really fluid balance point. The next time out the mount worked perfectly and finally, I had the GoTo scope I had been wanting for 20 years!
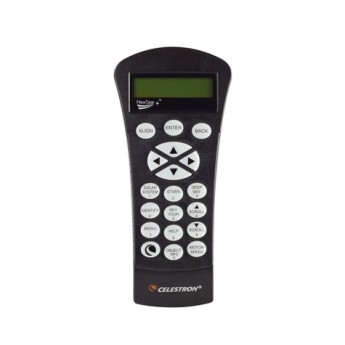
NexStar Hand Controller
The Modern Era
The two big pluses the new mount brought to my astronomy activities were mostly felt when I would do public stargazes. Of course speed was the main one; push the ENTER button and even if the object was on the complete opposite side of the sky from where the scope was pointed previously it would be in the eyepiece inside a minute which is a lot faster than I could have done it manually. This meant that instead of looking at three or four objects at a public stargaze you can get through eight or ten, and there’s a much better “geek out” factor amongst the public with an automated scope as well.
The second big benefit was tracking. When you’re showing the Ring Nebula or Saturn to a group of people you need to use pretty high power views which means you’re looking at a pretty small patch of sky, like about the size of a BB held at arms length, so if you’re not tracking well, every few people’s turn at the eyepiece the object will have drifted off to the edge or out of the field of view.
The setup and alignment routines you have to follow with the GoTo mount are pretty precise so objects that are found ‘stay put’ a lot longer, 10 minutes or more!
Once the“honeymoon was over” with the GoTo mount I began to find times where it didn’t perform up to my expectations in terms of finding or tracking or whatever so I began to investigate online what would cause pointing and tracking errors. Turns out there were a couple things that would affect it in a major way. One was polar alignment; if you want really good automatic pointing you really have to have that one axis pointed at the north star. The other was that the tripod really needed to be level on the ground. This was easily accomplished by actually paying attention to the bubble level that was built into the mount, easy enough.
The polar alignment issue was a little harder to fix. What I had been doing to this point was basically to just set the mount on the ground and eyeball it for both vertical and horizontal placement but apparently that technique was just random enough to yield annoyingly unpredictable results. So the solution here was to buy a little scope that actually screws into a special spot in the north/south axis of the scope, called a “polar axis finder” scope. The CG-5 had a place for one of these but it wasn’t standard equipment so it was time to order one. $50 later I had it and it just screwed right into the mount.
This thing has a little picture superimposed on the lens that has a map of the Big Dipper on one side and Cassiopeia on the other with a circle in the middle. The idea is that you rotate your mount until the position of the Big Dipper and Cassiopeia on the polar finder scope are the same orientation as you see them in the sky. Then you adjust your mount on the ground and with the fine controls so that the North Star is inside it’s special circle in the polar finder. If you can do this with a good bubble level setup, you are very close to perfect polar alignment and the results are spectacular; since I’ve started doing this objects will stay put in the eyepiece for a half hour or more!
Going Pro–Becoming the ‘Sky Guy’
In the summer of 2015 I decided to move from Cincinnati to Hilton Head Island, South Carolina, a frequent vacation spot for myself over the previous decades and by all accounts a decent place to live, especially in the winter! In doing the research about what kind of work I could pick up down here since my current career of music producer might not survive the move (it has) I wrangled an introduction to the activities coordinator at Marriott VacationClub’s Surfwatch property and pitched them on doing a weekly stargaze for their guests. They readily accepted when they heard my history and the events have been received spectacularly well by the resort attendees. All of a sudden, I was a ‘professional’ astronomer (of sorts) although I bill myself as an ‘Entertainer’ to distinguish myself from real professional astronomers who do real work to unravel the mysteries of the universe and how it ticks.
However I was getting paid which meant that everything I bought for the scope was now tax deductible! So I decided that I would do a few things to make viewing as easy as possible for the resort guests who aren’t used to looking through scopes really at all, and especially not really small, hard-to-look-through high power eyepieces. So I started by buying an inexpensive, low power wide field 56mm eyepiece for looking at big star clusters, the Andromeda Galaxy and the like. I also bought a fairly expensive ($100) 12.5mm eyepiece but with fairly large glass to look through that when combined with the barlow lens was capable of some quality high-power views up over 200x.
I was still missing that great combination of wide field and decent power and I the heard about the Meade Mega-Wide-Angle series 2” eyepieces that had an exceptionally wide view, big look-into opening and fairly high power at 15mm. Something like this isn’t cheap and to the tune of $200, it’s the most I’ve ever spent on an eyepiece. To pump this thing up some more I bought a 2” diameter barlow lens for about $90 which allowed a wide field, high power view like I had never seen before at 140x. The Hercules Cluster was a large brilliant ball of stars hanging in a wide field of space, remarkable and great for the guests to see. I now had a really complete set of eyepieces ranging from 9.6mm up to 56mm, 2x and 3x barlow lenses and it’s really gratifying to be able to put just the right combo together to get the right view for people.
Picture This
While I hadn’t completely stopped taking pictures in the previous years I did have to modify my choice of targets to things that my setup would accommodate, or at least not sabotage. So while long exposure photos through the scope had been impossible because of the polar alignment issues I was still able to mount a camera on the tracking scope mount and just point the camera at the sky (the Piggyback method) and open the shutter for up to 10 minutes and got some good wide field shots of the summer Milky Way, the entire constellation of Orion etc. While I was out at the Table Mountain Star Party in 2002 I bought a rig consisting of a 40mm eyepiece and adaptor ring that allowed me to attach my new digital camera (2.3 megapixel!!!) and shoot digitally some very short exposure “through the scope” shots of planets, especially Mars during the close approach of 2003.
Now that my whole polar alignment problem is under control and I’ve been wanting to take great astrophotos for over 30 years now it’s coming close to do or die (literally!) so I’ve made the final push and spent some real money on a new CCD camera setup. I’ll detail the specifics of the photography setup later in a separate blog post on the topic.
The single biggest obstacle to long exposure astrophotography is guiding accuracy, which comes about via a really good polar alignment setup. With my original mount I had a joystick that I could use to manually guide the mount N/S E/W when my target drifted a little. The problem was it was super easy to overcorrect and actually do more harm than good. I can’t tell you how many exposures I had to dump out of because of my own ham-handed manual guiding.
I can hear you saying, “That was fifteen years ago; don’t they have machines to do that now”? Well the answer is yes, in the form of auto-guider cameras. These digital cameras are run by a little software program on your computer that looks at the camera image and sends instructions via a wire to the mount itself to keep the guide star perfectly still in the image. Well this sounded like a good deal to me and since they’re just for guiding and not the actual picture, some of the technical restraints are relaxed for something like this making them reasonable in cost, like $250. The deal though is that you can only have one thing looking through the scope at a time so the guider needs it’s own light source.
Remember, the focuser I have has a “pick-off” mirror that siphoned a bit of the light off to a 2nd eyepiece where you could do your guiding. So I figured I’d stick the autoguide camera there, no problem, ready made solution, right? Wrong moosebreath! When I finally figured out how to control exposure and focus it became apparent that the auto guider was getting not one but three images from the pickoff mirror so I found out just exactly how useless this off-axis mirror was so now I’m hunting for another solution.
When I find myself in these situations I want the next thing I try to be an assured fix to the problem–no more half-baked solutions; let’s go straight to the problem and fix it. So a quick trip to Orion Telescopes turns up a short length, 4 inch in diameter scope that’s commonly used as a piggyback scope for the express purpose of autoguiding. A separate scope adds flexibility and the only thing needing to use the main scope is the actual imaging camera now. $120 later I have the autoguide scope, two scope mounting rings and a mount bar which I drill couple holes in so it will match some predrilled holes on the main scope rings.
Camera ObscurE
So the big decision was, what kind of real camera to buy. I had one of the old Orion “Starshoot” Color CCD cameras with an @ 250 x 250 pixel display but stupidly had lost the driver software for it and even more inexplicably, so had the manufacturer!!! So what to buy? I wanted something that was new technology. Santa Barbara Instruments Group was the brand leader in this department but their cameras with decent pixel counts were $2000 and up. I found a new product by a Chinese company, that had a maximum pixel dimension of over 3000 pixels in one direction and 2000 in the other, was coolable (keeps digital noise down), and had a fast communication speed by using USB 3.0. It was controllable by both Mac and Windows and was about $650 so it seemed like a bargain.
I can report that I've been able to get some understanding of how it all works and have made a few decent attempts at Moon shots which is your natural easy first target since exposure times are super short and you don't have to worry about stacking images. I had to deal with some of the other issues to get everything ready in the background so photography would be ready, and I admit there’s a certain amount of trepidation about having to learn a whole bunch of new stuff regarding exposure times for various kinds of objects ranging from bright (moon & planets) to dim (galaxies & nebulae). I’ll also need to learn how to stack multiple exposures on top of each other for the best contrast in images of dim galaxies and star clusters. More on this later as I untangle it all; I think the online forums are going to be a big resource here.
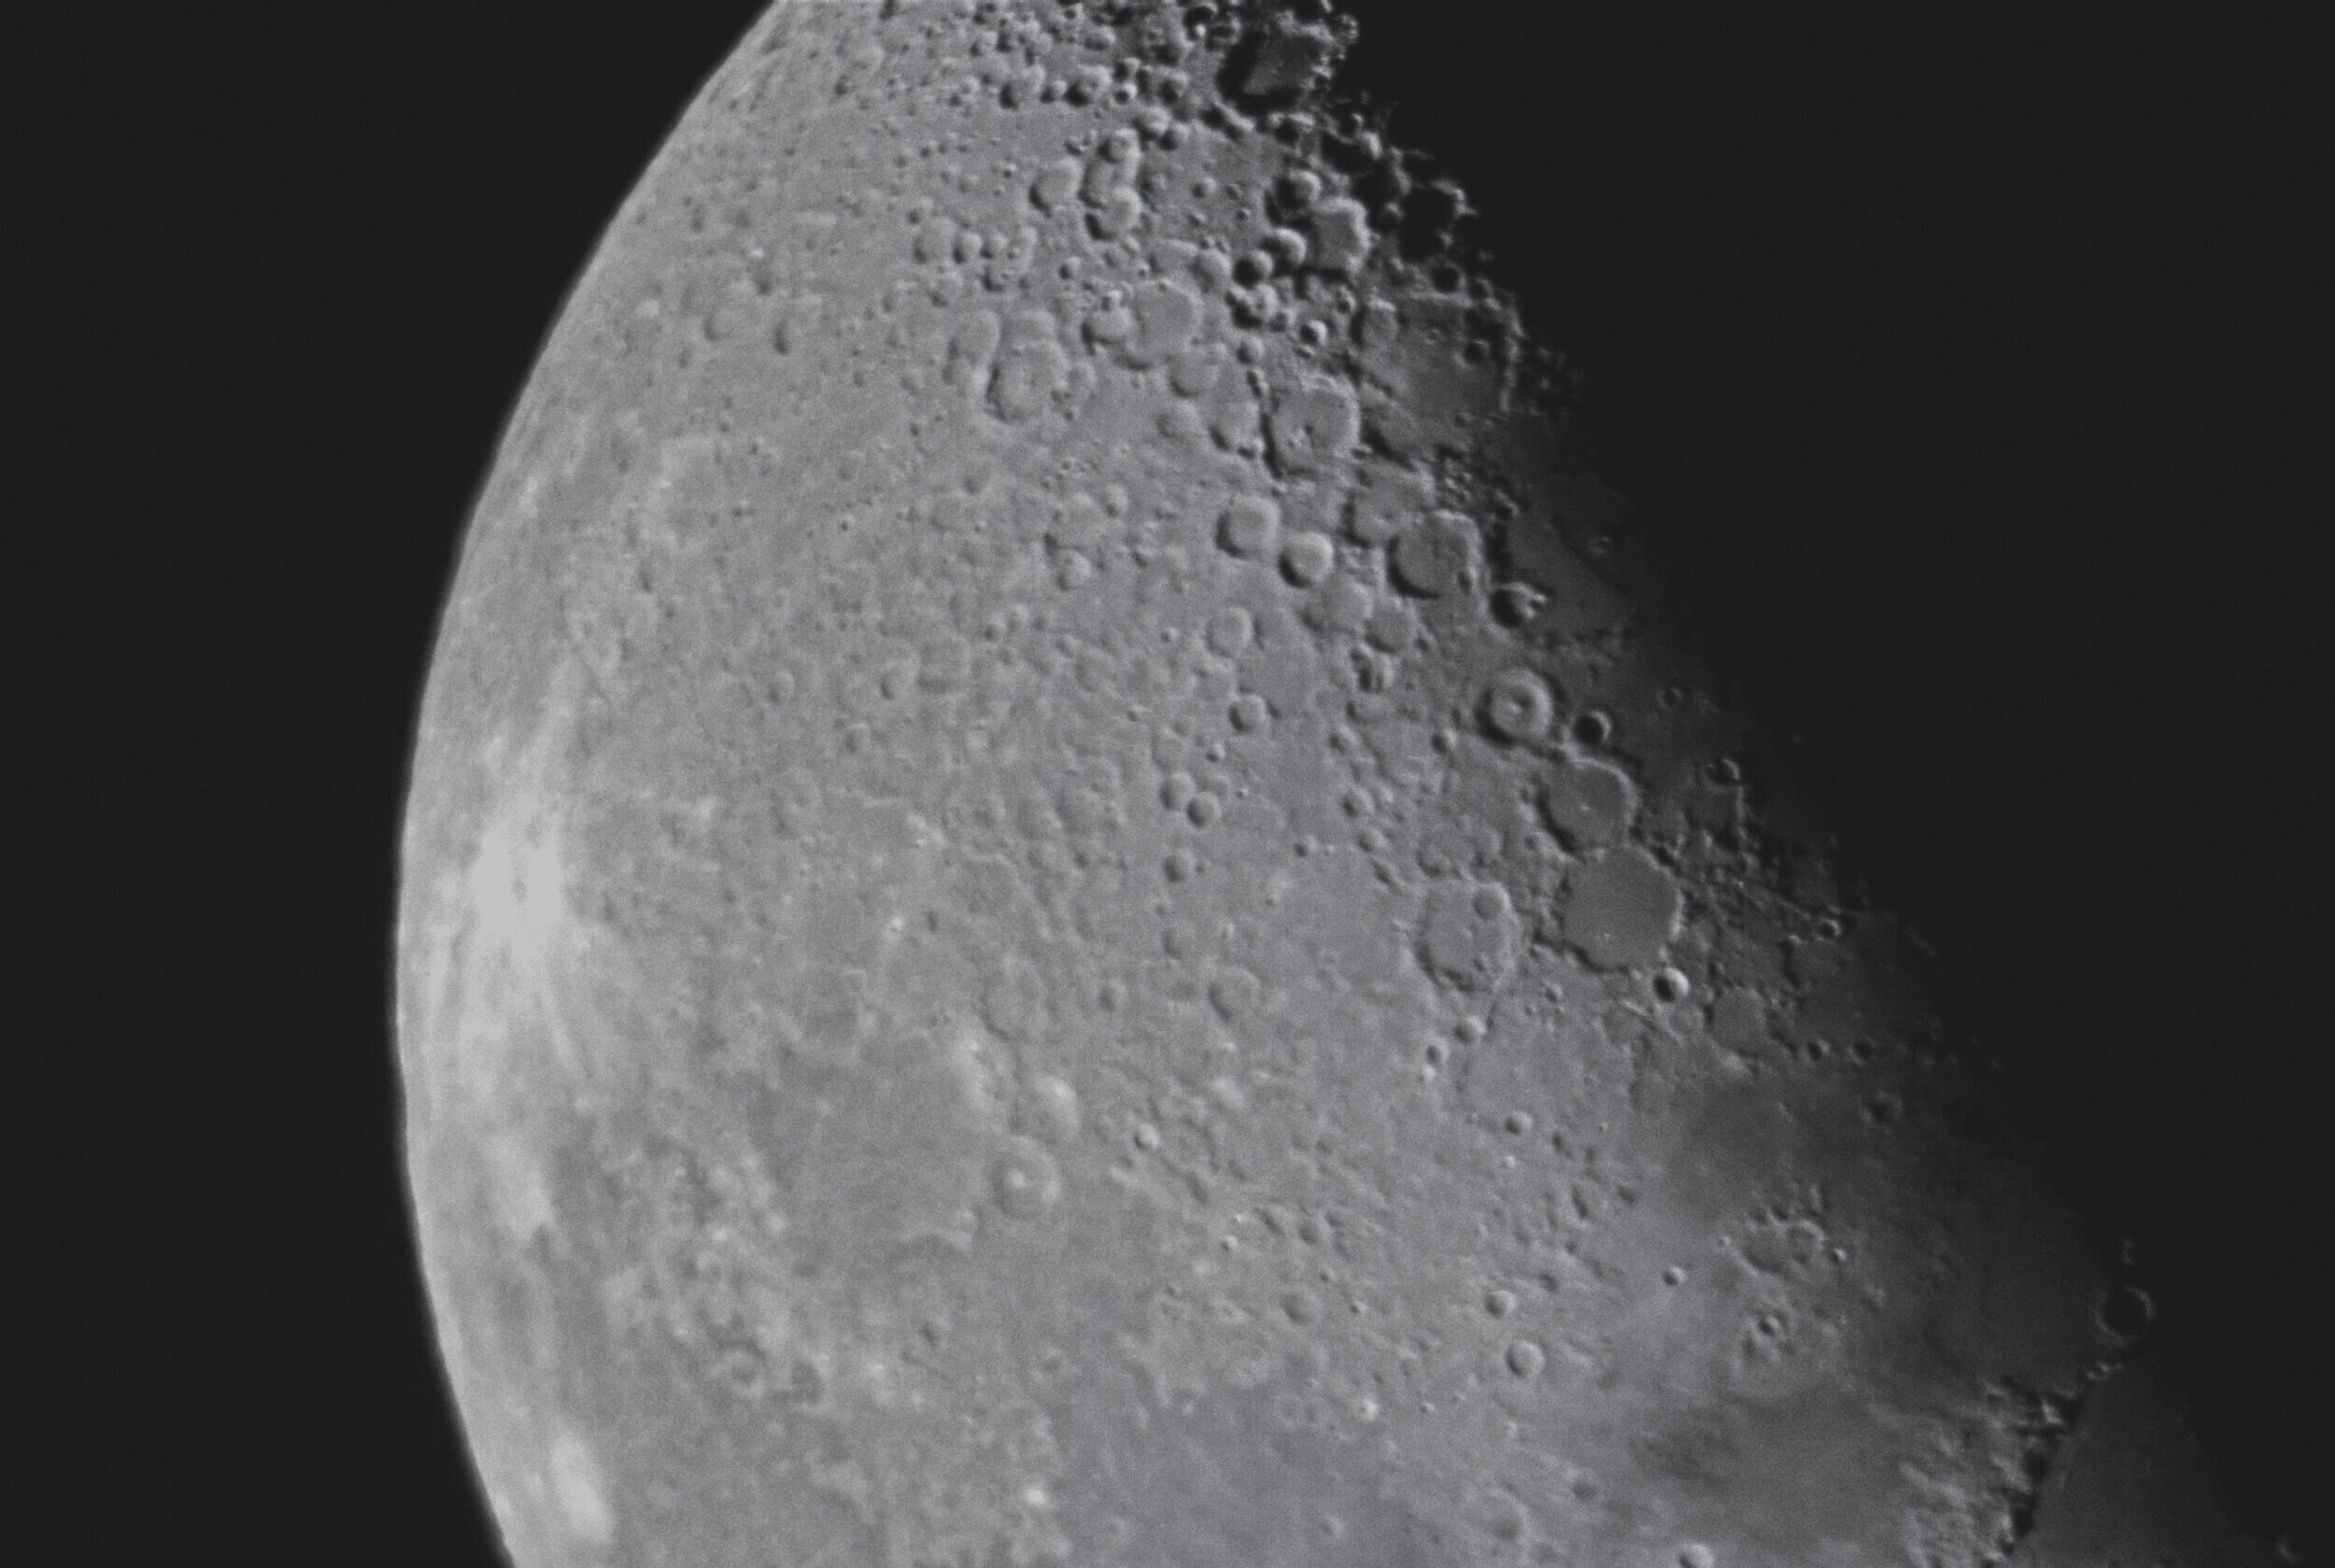
My first more or less successful attempt at using my new digital CMOS camera setup
Losing My Focus

There were two downstream effects from putting the independent auto-guide scope on. First, my old finder scope was completely unnecessary now so I took its 90° diagonal and crosshair eyepiece and repurposed them in the new guide scope to act as a “total overkill visual finder” scope when I was doing sky tours and so removed the old finder since it was dead weight and you want to keep your rig as light as possible.
Secondly, since I no longer needed the off-axis part of the main focuser, and the main focuser had always been a little bothersome in that it was hard to really get focused exactly because the rate of travel was too fast and you’d zoom right past your focus point. Also there was this little rough spot in the metal rack & pinion track which always seemed to be where you wanted to be. It was also metal, huge and really heavy.
So I decided to replace the entire focuser with something better and lighter. A survey turned up a number of candidates from $79 to $450 based on load capacity, having dual rate controls and whatnot. I went with the $79 Crayford style focuser which turned out to be nice and smooth and was a little easier to manage around the focal point.
Getting the new focuser on there was going to be the most major modification to the actual scope itself I had done to this point, especially when I discovered that the hole in the side of the tube that lets the light from the secondary mirror out was too small for the barrel of the new focuser when racked all the way in. This was going to require taking my scope completely apart, more so than I had ever done before and I was thankful that the Newtonian Reflector design is so easy to implement and that maintenance and service are really quite straight ahead.
So after considering various approaches I decided that I would draw a new circle of the correct diameter and use a rough file to enlarge the hole to my desired dimension. My telescope tube itself is made out of 1/8” plastic so it only took about a half hour of elbow grease to get the hole to proper dimensions, doing test fits along the way to make sure I didn’t overdo it. The final result wasn’t exceptionally pretty but I knew that the base of the focuser would cover my little filing inaccuracies and keep stray light from getting into the tube. Once I had the hole fitted all I had to do was mark and drill four mounting holes and bolt it on there with the supplied hardware.
After cleaning the main and secondary mirrors and reassembling things it was time to do some testing to make sure that my attempts at 'improving' things hadn’t actually been a step backwards. The first test was balance and experiments revealed that the scope was now lighter at the front (the old focuser was this huge metal thing) so the balance point had shifted. The scope now needed to be slid more to the left when I placed the dovetail bar in the slot on the mount head which is also good because when looking at things near the zenith (straight up) the scope tube would sometimes bump into the mount legs causing a pointing error or the inability to get to certain objects; this would help with that!
I then needed to go through all nine of my eyepieces both with and without the barlow lenses to make sure they could achieve focus and what kinds of extension tubes and whatnot would be required to make that happen. So I set the scope up behind my car in the parking lot with the full moon glowing overhead and spent an hour looking at the moon from 18x up to a fairly useless 400x and came to the conclusion that the focusing extension tube I bought on a whim earlier that year was a smart choice. It turned out it was absolutely necessary for all eyepieces without a barlow lens in, and a big help when you were using the barlow.
What was going on was that the new focuser had a much lower profile which was good in a number of ways but the actual focal point of the converging light beam was farther outside the tube than the focuser could put an eyepiece so the extension tube acted as a “stand-off” to hoist the eyepieces up a bit higher into the focal plane. The action of the new focuser was silky smooth and slower than my original one so even though it was a lot of trouble, it was a good upgrade.
Holy Tube Repair!
After removing the old focuser, the completely new form factor of the new focuser left some pretty big open, now unused screw holes in the tube along with some other holes from the addition and removal of various finder scopes and whatnot over the years. One of the cardinal rules is “don’t let stray light into your telescope tube"–this was a situation that couldn’t be ignored anymore and I used some heavy black gaffers (duct) tape over the various holes in the tube, mostly because there wasn’t a formula of WD-40 thick enough!
More Computers Now!!!
So the scope and mount are now tracking well, the hand controller is finding things in the sky accurately, sometimes even with high power eyepieces in, so that’s the end of accessorizing right? Not a chance…
The thing about the hand controller is that it finds things when you know what you’re looking for. You have to know what it is you’re after and have the catalog number memorized so you can type it in. This is not really a big deal since I have thirty years experience in looking at the sky and you’d be hard pressed to put me down in front of any sky at any time of year and not have me be able to think of something to view where I know the catalog number from memory. And if I’m a little hazy on what the NGC catalogue number is of the 2nd component of the Double Cluster in Perseus is, there’s a sky map on my iPhone to look it up. This is fine but you end up looking at the same stuff over and over which is standard procedure for public stargazes but sometimes there’s really good stuff to see that you’ve forgotten about and need to have your memory jogged.
So the next logical step would to be able to look at a map of the sky on your computer, tablet or phone, see an interesting object on the map, select it and hit the GoTo button right on your phone and have the telescope slew to the new object without touching the hand controller at all!
Enter Sky-Fi…
SkyFi is a $199 rechargeable battery powered hardware box that is a combination of a WiFi router and telescope controller. It communicates to the scope through a data input port on the bottom of the NexStar hand controller and is findable as a WiFi source on any of your portable devices. It works in conjunction with the new SkySafari Software (available for both computer and portable devices) as well as the venerable StarryNight program from your computer.
This is really terrific (besides the off-the-charts ‘geek factor’) to be able to look at a map of the area surrounding M57, the Ring Nebula and be reminded that the nearby M56 is a really good globular star cluster to look at. Click and GoTo, awesome! This will really help with finding new, interesting things to view, without making anybody wait.
Wrap Up
Well that’s the story of me and my telescope over the years; not that I wrote all that because it’s all just so very fascinating to read but I hope it will be illustrative as to the kinds of things that are out there product wise and how you might employ them, and I tried to add lots of little tidbits of knowledge I’ve gained over the years that will help you as you get going in this fascinating hobby.
Good luck and keep looking up and wondering!
Bill the Sky Guy, October 2016
Addendum for 2020
New Scopes and accessories
Well I finally did it, after 31 years with the Edmund Scientific I bought a new telescope! Well, five actually. I decided that while I was still young enough to move such a thing around (and can still see!) I would finally own a large telescope. I had been seeing the same objects with the same scope for 31 years now so I decided to kick it up a notch; well, a couple dozen notches actually!
Obsessed? Well Maybe…
Around May of 2018 I purchased an "Obsession" 18 inch truss-mount Dobsonian telescope which gathers over 500% more light than the 8 inch did. Although it weighs 125 pounds assembled, it breaks down into three pieces for relatively easy transport. I found a guy within driving distance who was selling one of these used and decided to take the plunge.
Obsession scopes don’t come with tracking motors or GoTo functionality but there’s a third party company called RX Designs that makes the “StellarCAT” aftermarket motor package which is great but you have to install it yourself which required some woodworking skills right at the limit of my ability. I eventually got it in and working, it’s terrific!
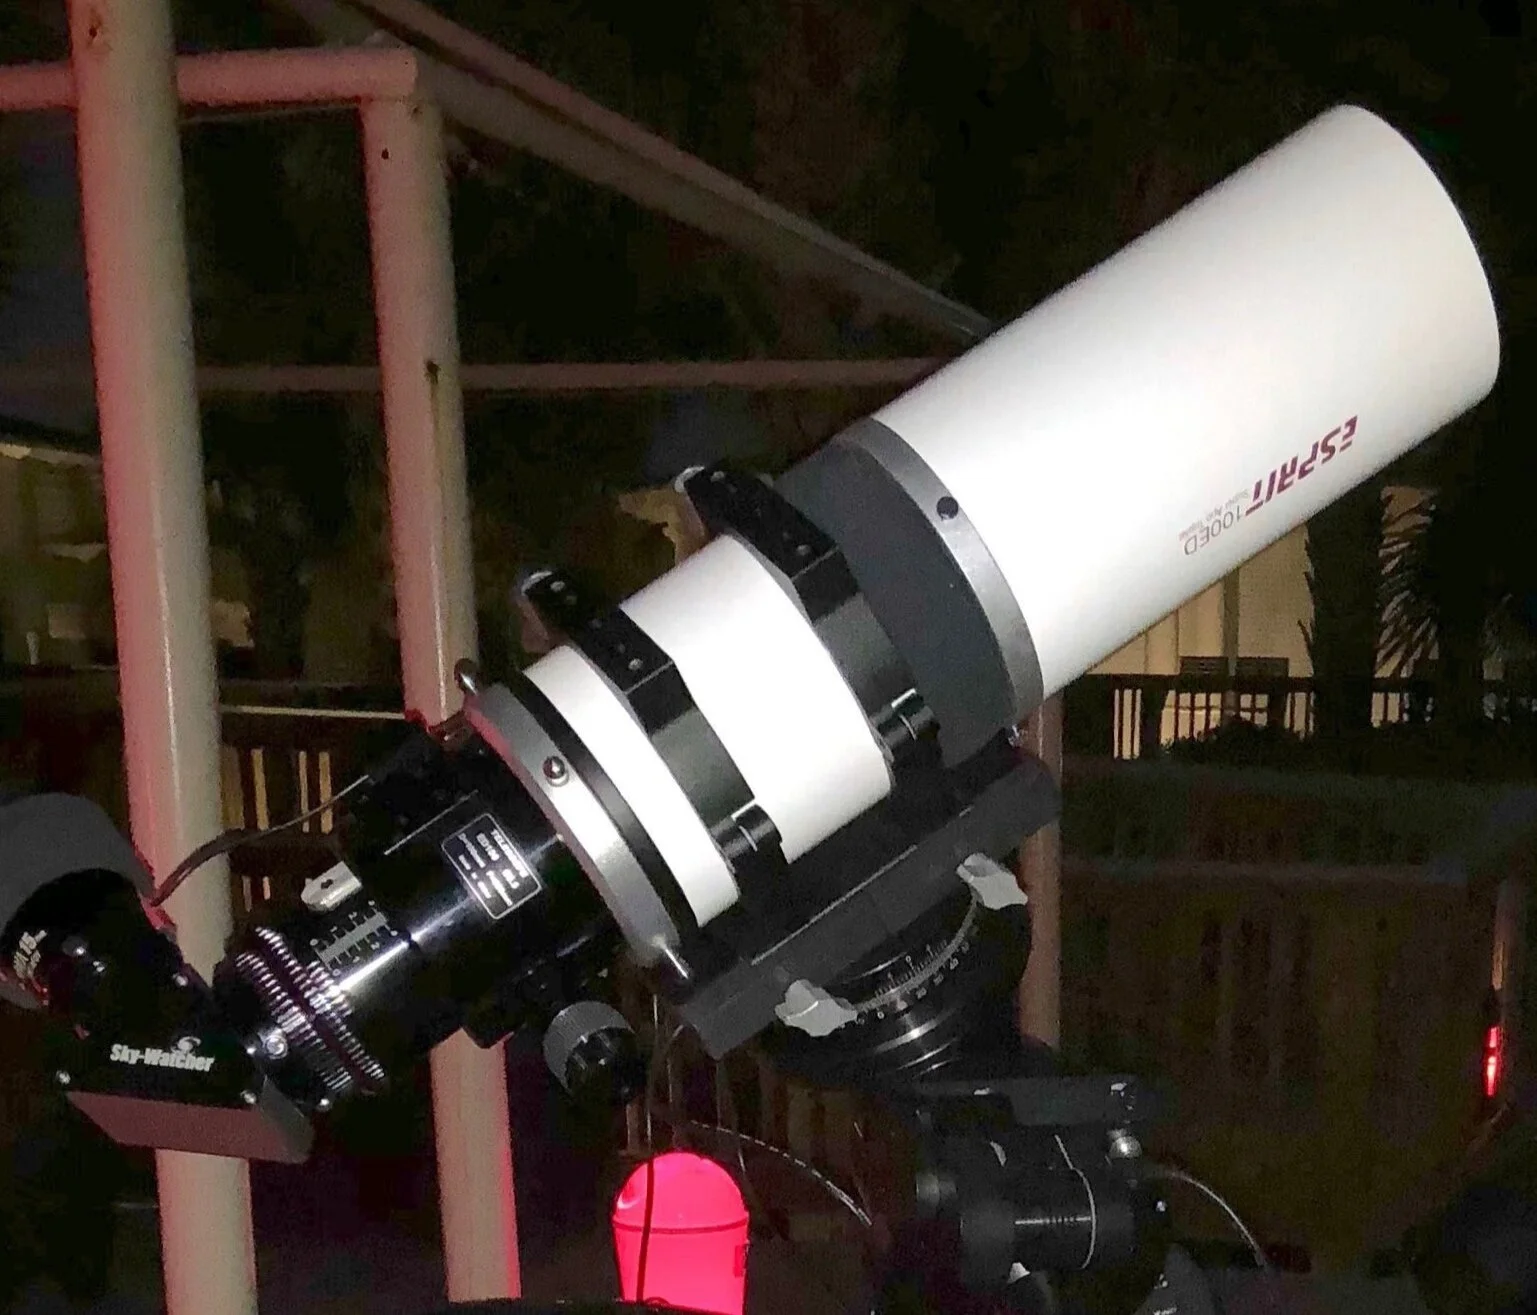
100mm SkyWatcher ‘Esprit’ Refractor
The new Obsession scope is incredible visually but is not well suited for long-exposure astrophotography–the alt/azimuth (up/down & left/right) mount introduces ‘field rotation” in images but could be awesome for planets where the exposures are short. Since for some inexplicable reason I still want to take pictures of galaxies and nebula I bought a second new telescope specifically for that purpose. I noticed that in order to take wide-field images of big nebulae in the sky you pretty much had to have one of these very high quality, short focal length refractor scopes so I bought a SkyWatcher Esprit 100 4-inch “triplet design” refractor which is terrific for that task and only about $2500. This thing is a joy to use, doesn’t weigh a lot (so the mount doesn’t struggle in the slightest) and gives razor sharp images.
10-inch Astrograph
Shortly after this I purchased an 10-inch Ritchey-Chretien astrograph ($3000) telescope for closeup images and a Losmandy G-11 equatorial mount (with the very capable Gemini2 control system) which is true thing of beauty! The “Astrograpgh” design is supposed to give you pinpoint stars all the way to the outer edges of your image–the Hubble is an astrograph design. As it turns out, this design of telescope is a bit tricky to keep the multiple mirrors and optical pathway adjusted precisely enough to get that promised ‘completely flat field’. I had been using this scope for stargazes when the Obsession was not the right one but it was heavy and I had to do some funny things with tubes and lenses to get the majority of my eyepieces to reach focus. There was no such thing as anything even approaching a wide field view from it I started looking for a scope that I could afford that would be better suited to the “all in one” nature of a good public stargaze scope.
More Refraction
I had always been impressed with the crystal clear views from the 4” refractor so when I saw that you could get a six-inch ‘doublet’ design refractor for $800 I thought that would be a good solution to not banging around the 10-inch Astrograph at stargazes and still having decent aperture. I got an Explore Scientific AR-152 6-inch refractor which, since it’s a doublet lens setup, has a little color fringing around super bright objects like the Moon and the brightest of stars. A triplet version of this scope is available but it’s $6000 and that was just a little to much for an impulse buy like this! So I rationalized it this way, “With a doublet you get 90% of a triplet at 1/10th the price!” Works for me…
Love this scope too! It’s not heavy at 23 lbs and it’s always in one piece so ‘no assembly required” other than throwing it up onto the mount. I’ve compared this scope’s view against a 10” Newtonian and what it lacks in aperture it makes up for in clarity. Star clusters are razor sharp as are the edges of bright galaxies.
The New Hotness: Go Fast or go home
Celestron has recently introduced a new line of photographic only telescopes called a “RASA” which is an acronym for a “Rowe-Ackerman-Schmidt Astrograph” design. This setup is similar in a lot of ways to a Schmidt-Cassegrain except the secondary mirror is replaced by a focusing lens and you put the camera up front by the main corrector plate instead of at the back. They make them in 8-inch and 11-inch sizes; of course I got the 11”.
There are some really cool advantages tot he design: really sharp stars at the edges of the photo (a function of the astrograph part of the design), large aperture for light gathering, short focal length (620mm instead of the 2000mm for the Schmidt=Cass) for a wide field of view and a really fast F-ratio: f/2!!! This means this baby sucks up a lot of light and quickly!!! This translates to shorter exposures for the same kind of saturation and you throw less of them away because less time for a tracking error or cloud to happen.
Going Solar
Ever since I looked through some H-Alpha Solar Scopes at some star parties I had been to, I’ve always wanted to have one. The Cincy Astronomical Society had an H-Alpha filter for their Clark scope but it was super expensive and only really worked at the middle of the image so it wasn’t really all that great an experience for the money.
But then I started seeing these dedicated Solar Scopes from manufacturers Coronado and Lunt and ended up getting a good deal on a Lunt LS60T H-Alpha scope which I keep set up in the living room for a quick trip out to the patio for some impromptu solar observing. It’s very cool to be able to see solar prominences streaming out into space on the limb of the Sun and the granular nature of the ‘surface’. There haven’t been hardly any sunspots lately; where is the solar maximum when you need it!
Widefield astronomical Cameras
Although I was starting to have some success taking pictures through the refractor and the astrograph it became apparent that the size of my camera’s CMOS sensor was not big enough and that meant a big jump in resolution (and cost) was going to have to happen. So I figured if you’re going to spend ‘real money’, spending it on the thing that actually takes your image isn’t a bad idea so I threw down for a ZWO ASI-094 electrically cooled, full size sensor camera. With this new setup I can see about four degrees of sky (eight times the visual width of the Moon) and has allowed me to take those big, expansive nebula shots you can see in the gallery elsewhere on this site.
New for 2020 is a QHY-600 Full format monochrome camera with a ZWO filter wheel. This has turned out to be a game changer! The detail in these photos is really two notches better than the color camera and is worth all the extra trouble with filters and all that.
Eyepieces
There’s very few places in a visual telescope rig where you can spend money more effectively than by having good eyepieces. So slowly but surely I’ve been acquiring a nice set of TeleVue eyepieces which are just absolutely fantastic, giving crystal clear views that are well, eye popping! Currently I’m working:
35mm Panoptic, 27mm Panoptic, 21mm Ethos, 17mm Nagler Type 4, 9mm DeLite, 5mm Nagler Type 6, as well as a 55m Plossl for when you just have to see as much sky as possible.
This page is long enough already so I will detail the exploits with the new scopes in blog posts in the Astroblog area of this site.
Bill the Sky Guy, July 2020