
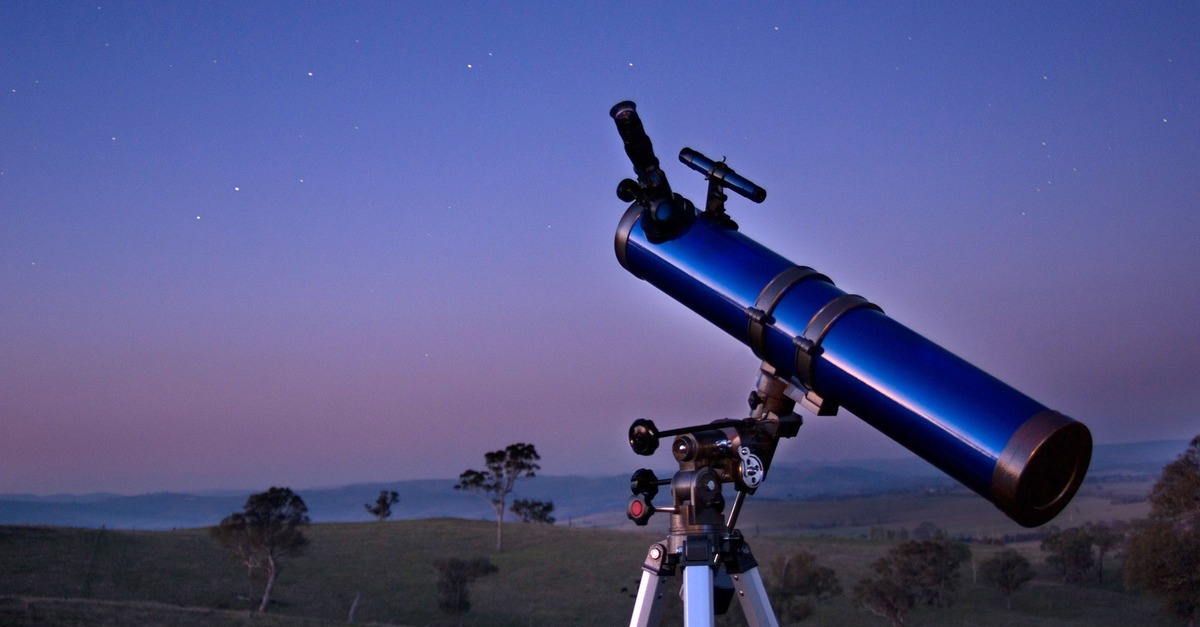
Buying a telescope…
One of the things I get asked a lot is, "what kind of telescope should I get?". Unfortunately there is no super easy answer to that deceptively complex question. Buying the right telescope is an almost maddening exercise in trying to balance wants versus needs, budget versus usability and those kinds of issues.
Of course you want the biggest, baddest telescope money can buy and see all kinds of great stuff in the sky, but if it takes an hour to set up and prepare that scope for viewing, how often do you think you'll actually use it? Thus the pat answer, "The best scope is the one you'll actually use!"
So the factors that are in play in making your decision are:
- Light pollution conditions at your main observing location
- What kind of sky objects you would like to view?
- How long do you realistically think your observing sessions will last?
- Is the scope for a youngster or an adult?
- What level of knowledge of the sky do you have or are willing to acquire?
- Are you interested in doing imaging (photography) through the scope?
- Are you prepared to spend some additional money on key accessories once the "honeymoon" is over?
- What kind of horizon do you have at your observing location?
- Price of course…
These are all deceivingly related issues that, once you've defined how you want to observe will make your purchasing decision fairly straight-forward.
For instance:
- If you live in the city with bad light pollution but want to see deep-sky objects like galaxies and faint nebula that means you'll be buying a fairly large scope, and will do your observing in long sessions where you'll be driving a fair distance to get away from the city's skyglow.
- If you want a big scope that will mean that setup and alignment with the sky will take some time and you'll invest a half-hour or more of your time before seeing anything on any given observing session.
- If you live in the city but are mostly interested in planets, the Moon, double stars and the brightest deep-sky objects then you don't need a big scope, you need a high quality one on a stable mount so you can view at high magnifications.
- If your knowledge of the sky is limited then you will be aided by having a "GoTo" motorized mount that will find things for you.
- If you don't have a lot of time to devote to observing in one big observing session then you need a scope that is simple to get up and running so you don't spend 15 minutes of your half hour observing session getting set up.
Now that we've thought about our goals let's get familiar with the main kinds of telescopes available these days.
Mount Up
First let's understand that what most people commonly think of as a "telescope" is really two things, a telescope (the optical tube itself with all the lenses and mirrors it might have), and a mount for the tube which is no less important. The two things must work together well as a total system–a great scope on a flimsy mount will be a shaky, frustrating observing experience so the mount is just as important as the telescope itself. Your typical $99 WalMart scope sucks mostly because of a bad mount (and eyepieces that magnify too much) rather than overall poor optical quality.
Tip: If you have one of these "starter" scopes and can't really upgrade to a better instrument right now here's a "scope hack" to make things a notch better. Take an empty plastic gallon milk container and fill it with water. Then find a way to hang it from the center of your mount between the tripod legs using twine or a small chain. And of course make sure every screw connection on the mount is as tight as it can be.
There are a number of different mount types but most are variations on one of these two types:
- Altitude/Azimuth (commonly written as "Alt/Az")
- Equatorial
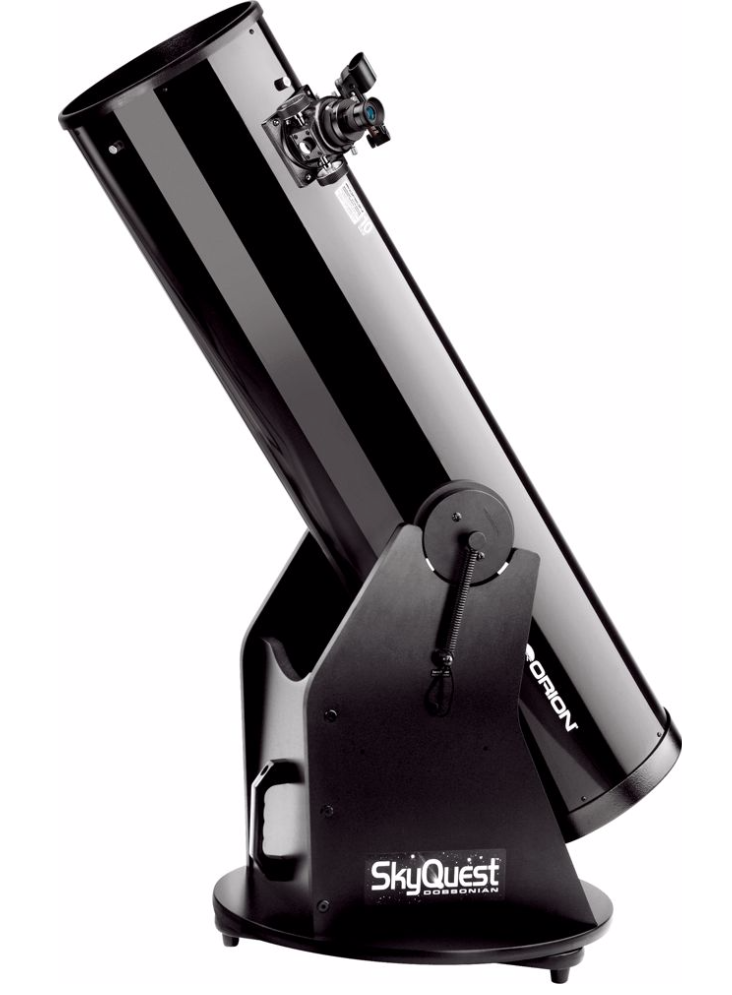
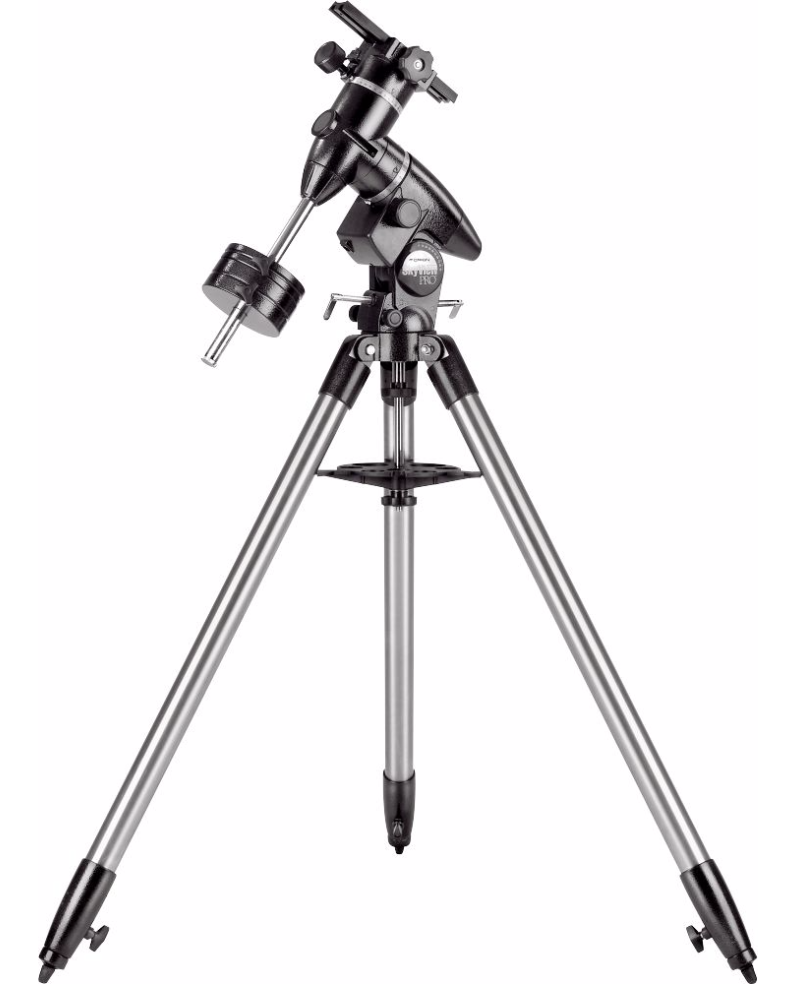
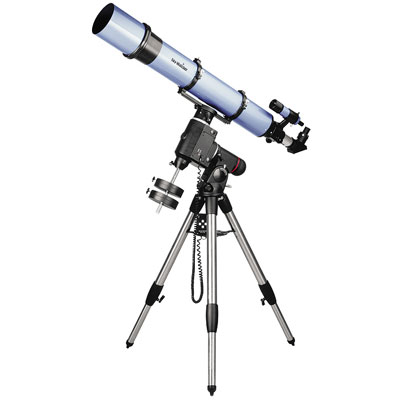
Above: Alt/Azimuth mount in a "Dobsonian" design (left); Equatorial type (right).
So what are the characteristics of each?
The Alt/Azimuth mount is basically an Up/Down (altitude) Left/Right (azimuth) kind of affair which makes it easy to build solidly, set up and understand its operation, but a little trickier to motorize so that it compensates for the Earth's rotation which moves objects out of the eyepiece view surprisingly quickly. These mounts are also not very well suited to photography if you plan to leave the "shutter" open long enough to image faint sky objects. They're fine for planetary and lunar imaging though.
The Equatorial mount is a little trickier at first but has some clear advantages as you become a more advanced user. Whereas the Alt/Az mount doesn't really care how you set it on the ground when you start, the Equatorial mount has it's North/South axis oriented with the spin axis of the Earth itself. This means that you need to plop it on the ground at the beginning of the night facing north, and correctly set for whatever latitude you're observing from (the continental US ranges from about 28° to 47° North Latitude) which is pretty much right at the star Polaris. This axis adjusts the telescope in a north/south direction also referred to as "declination" or "dec" The other axis moves the telescope east/west which is referred to as "right ascension" or R.A.
When properly aligned, the equatorially mounted telescope only has to move in the East/West (R.A.) in order to track an object as it moves across the sky and this can be accomplished with a simple manual control knob ("old skool") with no need for a computer or motor drive, although those things are good to have, albeit at increased cost. An equatorial mount is generally preferred when doing long exposure astrophotography as well.
Scope In
There are basically three types of telescopes that are popular today with the majority of amateur astronomers. They are:
- The Refractor
- The Newtonian Reflector
- The Schmidt/Cassegrain
The Refractor
The most recognizable telescope design is the refractor. This is the classic "light comes in one end and you look through the opposite end" as depicted by the diagram below.

Like anything this design has it's advantages and disadvantages. The good thing about refractors is that they are easy to make, understand and maintain. They are not overly large unless you want large aperture. They are excellent for looking at planets and the Moon and give high-quality images.
Some of the not so good things about refractors are that you are limited to small apertures or the telescope (and the mount to hold it) becomes truly gigantic; anything larger than a 6-inch diameter refractor gets way beyond what you can drag out of the garage, plop down on the driveway and have a quick look at Jupiter or Saturn. Also, since you'll be looking at planets and to get good views you'll need to be viewing at relatively high magnifications, the mount you put it on has to be extremely solid so it doesn't shake all over the place when you touch the focusing knob.
Pricing can be an issue as well since a really well-made refractor gets up into the thousands of dollars for the scope alone and the inexpensive ones ($150-$400) usually leave a lot to be desired in both image quality and mount sturdiness. There seem to be only a few "middle ground" choices in the $750-$1000 range.
Newtonian Reflectors
The Newtonian Reflector uses a mirror at the back of the scope instead of a lens in the front and is particularly well suited for large aperture scopes that are still quite portable. Check out the diagram below:
The tube of a reflecting telescope is open to the air in the front unlike the "closed" design of the refractor. It has a main mirror that must be figured to high precision or the image you eventually see will be sub-standard. Fortunately you can put some really large-aperture mirrors in tubes that are only three to five feet long giving you some pretty amazing deep-sky views.
Reflecting telescopes are easy to make and maintain and cleaning is easy too. There is a mounting method for this design of scope called a "Dobsonian" mount that is both easy to make and extremely sturdy making large aperture telescopes (8-12") possible while still being quite portable and affordable.
On the down side, these larger diameter scopes are a bit more of a challenge to motorize due to their size and weight although there are some innovative solutions out there. Due to their large aperture they are better at deep sky objects but sometimes not as sharp with bright solar system objects, sometimes actually needing to be "stopped down" to a four-inch diameter by blocking some of the light coming in with an "aperture mask".
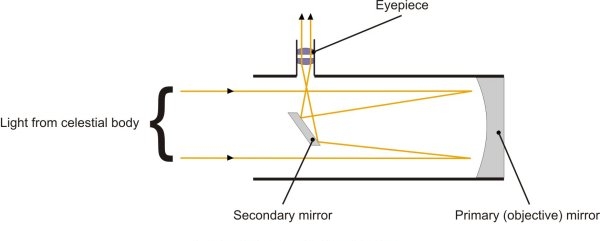
The Schmidt-Cassegrain Design
A Schmidt-Cassegrain design is kind of like a 'best of both worlds' design using elements of both refractor and reflector telescopes, as evidenced by the diagram below.

This design is a little more complicated so I'll provide some explanation. Incoming light enters from the right and passes through a 'corrector plate' made of glass that has a hole cut in the middle of it where there is mounted a small mirror, the 'secondary' mirror. Once past the corrector plate the light hits a curved primary mirror that starts the light converging onto the secondary which then directs it back down to the primary through a hole cut in the center. From there the light passes outside the back of the tube, hits a flat mirror called a 'star diagonal' which sends it sideways into the eyepiece so you can view comfortably without craning your neck.
Upside
One of the chief advantages of this design is it's compact form that achieves a fairly long total focal length which gives you good magnification values from your eyepieces. (To understand more about the relationship of telescope focal length to eyepiece magnification see this article elsewhere in the FAQ section here.)
It's small form also allows it to be easily mounted on equatorial style motorized mounts which are easy to add the 'GoTo' automatic pointing software to.
downside
However there are some downsides to this design as well I've noticed over the years.
First, maintenance is not easy on these scopes. It's very tough to get inside and clean if you need to do that and having proper alignment of all optical components (called "collimation") is typically something where you need to send it back to a service center if it gets knocked out of adjustment. In contrast I can collimate my Newtonian Reflector in two minutes using only my fingers and a laser tool I bought. I do it before every observing session rather than waiting until it gets so bad I can't stand it anymore and having to go through all the trouble of shipping something large, heavy and fragile.
Secondly, because these things have a glass collector plate at the very front of the scope, dew is a huge problem. Most people have to go buy a heater strip that wraps around the outside of the scope up by the front. This requires a decent amount of power and many people have to buy a 2nd power supply to power their dew equipment. Also many employ a physical dew shield made out of curved, flexible plastic that extends out beyond the front of the tube to keep dew from having access to the front of the lens (unless you're looking towards the Zenith); for that you have to rely on the heater.
So as you can see, like relationships on Facebook, "it's complicated" when you own a Schmidt/Cass…
Cutting to the chase
So what do I recommend as a scope for a youngster or new enthusiast? I have two recommendations…
Scope Recommendation #1: If you want to observe deep sky things like star clusters and some nebulae and your light pollution isn't absolutely horrible a six or eight inch Newtonian Reflector in a Dobsonian mount with a GoTo motorized setup (eight-inch and larger models) is relatively lightweight, sturdy and easy to set up at the beginning of the night. They range in price from $200 (six-inch, all manual) to about $700-$1000 for an eight-inch with full GoTo capability. You can even find some ten-inch GoTo models that are under $1000.
Scope Recommendation #2: If you find the idea of a telescope that is in multiple pieces (tube and mount plus accessories) and the idea of doing a sky alignment to get the GoTo computer going before observing just too daunting there is a real cool option the Meade ETX series. The Models ETX 80, 90 & 125 start at $350 and are most decidedly ‘not junk’, and have GoTo capability. They are great for taking on excursions out into the country or just plopping these self contained units down on the driveway for a bit. They are small so the tripods that hold them up aren't heavy or difficult to manage. At around three to four inches in diameter they're not going to see very faint stuff like you could see with an eight or ten inch scope but what you see, you'll see very well.
Remember, the best telescope is the one you'll actually use, so think long and hard about these options here…
Accessories: If you've read the My Scope page on here where I detail which accessories I bought and why, you'll know you can go truly nuts buying accessories! I'm going to break down accessories into three categories: Essentials, Good to Have and Luxury.
Essentials:
- Eyepieces: When you buy a telescope it usually has an eyepiece with it. It typically is a medium power eyepiece like a 28mm and would be generally considered ‘nothing special’ in the quality department. With just one eyepiece you only have one possible view and that's never good so I recommend getting two additional eyepieces or at least one for high power views. Adding a 15mm eyepiece will give you a nice boost in power but not be so uncomfortable to look through that you'll avoid it, especially if you wear glasses all the time like I do.
- Barlow Lens: These basically come in two flavors, a 2x power boost, and a 3x boost. They get inserted where your eyepiece would usually go, then the eyepiece goes into the end of the barlow giving you an automatic doubling or tripling of magnification. There is a point of diminishing returns with respect to image quality and power (more power equals a less crisp image) so a good rule of thumb is to not go much past 30x for each inch of aperture. So if you have an eight-inch diameter scope things are going to start looking pretty mushy after about 240x. So don't buy the 3x barlow if it's going to take your highest power eyepiece past the ‘30x per aperture inch’ rule.
- Buying Eyepieces and a Barlow Lens at the same time presents you with some decision making. What you're trying to avoid is having your low power eyepiece, when it's in the barlow, end up being the same magnification as one of your other eyepieces without the barlow. If you plan it right you can have a relatively even distribution of magnifications with six choices from 3 eyepieces and a barlow.
So, to figure this all out you need to know the formula for calculating magnification on a telescope. First, find out the focal length of your telescope in millimeters; it's almost always on the scope tube somewhere on a sticker or something. Both of the recommended scopes above are 1200mm. Then divide the eyepiece focal length (also in mm) into the scope focal length. So if you received a 28mm eyepiece with your scope it would give you 43x (1200 divided by 28), with a 2x barlow that's 86x, with a 3x=129x. As you see it's the 2x or 3x barlow that's really driving the decision here.
For example with an eight inch scope your maximum practical magnification is going to be just over 200x. In this situation if you got the 3x barlow and a 15mm eyepiece (80x on its own and 240x with 3x barlow) and a 40mm (30x alone and 90x w/barlow). So with 15mm, 28mm and 40mm eyepieces and a 3x barlow your scope will have magnifications of 30x, 43x, 80x, 86x, 90x, 129x, 240x. This is a pretty good range of magnifications but there is kind of a bunching from 80x-90x and kind of a large gap from 129x to 240x.
Let's see what we would get if we switched the barlow to a 2x model. Our new magnifications would be 30x, 43x, 60x, 80x, 86x, 160x. This is a better spread but has less overall magnification at the top end.
Good to Have
- Oxygen III ("O3") Filter or Lumicon UHC Narrow Bandpass filter for planetary nebuiae.
- Laser Collimator tool (if you go with a Newtonian Reflector design scope): this will give you a quick and easy way to keep your optics in excellent alignment.
Luxury
- Decadently expensive eyepiece(s)… You can just about spend as much on a single eyepiece as you did for your whole scope and mount! There are models out there in the $500-$700 range but as you might expect it would be silly to buy one of those for a scope like we're talking about here in the same way it would be silly to put an Indy-Car engine in a Pinto!
However it would not be a waste of money to get one good, all purpose high quality eyepiece that you could use in a wide variety of situations. One of the things that is tricky to do well when designing and making an eyepiece is getting some decent magnification but also having a wide field of view with minimal distortion ('coma') out at the edge of the field of view ("FOV"). Therefore these are some of the pricier models out there and well worth the money.
Be conscious of the barrel size of the eyepiece when buying. The eyepieces we have been referring to thus far are the standard 1.25 inch barrel size. Many of the juicy eyepieces are the next standard size up: two inches. I recommend sticking with the 1.25 inch size because you can still use it with your barlow. There should be many options to choose from in the $90 to $200 range.
How the Go-To Scopes work
In order to reap the benefits of a GoTo design mount, you have to be willing to invest a little time up front learning the procedure for getting it aligned to the sky at the beginning of the night, to provide the computer an accurate starting point from which to find sky objects. If, after reading how this is done you are having a "too geeky, no way–freak out" then don't buy a Go-To scope, but I promise you it's worth the effort, so be patient (you wuss… :-)
Once you know how to do it well it will only take 3-5 minutes but the first time you do it, it will take longer so make that first or second time out with the scope really just a "training mission" and not necessarily being disappointed if you don't get a lot of observing in.
The procedure varies slightly from manufacturer to manufacturer but there are many similarities so I'll concentrate on those in my description.
When you power up the scope for the first time the hand-controller is going to display a couple of things like the version of the software in the controller or a warning not to look at the Sun with your scope (DUH!) and then it will ask you for the following things:
- The date
- The time (down to the second)
- Is Daylight Savings Time in effect?
- The Longitude and Latitude of your observing location that night, with a fair amount of precision.
- Your Altitude above sea level (some models).
Most of these things are no-brainers but the Longitude/Latitude/Altitude is not something you're going to pluck from memory most likely. I use an iPhone app to give me all of this data which I refer to as I go through the data input screens for all this. It needs this information in order to determine which stars are actually above the horizon at that place and time where you are. Most of the scopes remember the Longitude and Latitude setting even when the power is turned off so if you observe from the same place most of the time you don't have to enter that data every observing session.
At this point methods of alignment start to diverge a little but the next step is usually to find one or more specific stars in the sky. The hand controller has a data chip on it with a catalog of thirty to forty thousand sky objects! This includes eighty or so really bright, easy to find stars that are in a special list of "Alignment Stars". These are easy stars like Vega, Sirius, Capella and the like which you probably know already. But there are a bunch of stars in the list you probably don't know like Mirfak, Alpheratz and Navi! So if you don't know many star names (like me) don't worry, just get a smartphone sky map app that when you hold the phone up to the sky, it shows you the sky behind the phone. Scan the sky and track down the unfamiliar star–it's a bright one.
The more stars you include in your initial alignment 'run', the more accurate your automatic finding of sky objects will be. Even though some models have a "one star" alignment I recommend going with two, three if it's available.
The Dobsonian mount GoTo scopes really don't care how you plop them down on the ground at first so they make you find the first star completely on your own. You use the buttons to accept their suggested first alignment star as the one you're going to find (or choose another if it's blocked by trees or something) and then slew the telescope to that star with the up/down left/right buttons, getting it centered in the field of view in a high power eyepiece. This might also be a good time to check and see how well your finder scope (or reflex sight) is aligned and make any adjustments as necessary. Press the appropriate button to tell it "Yes, in fact you are dead center on Vega" and then it will try to find the second star on it's own. It will miss but it will be close; use your nudge buttons to center this star up in a high power eyepiece as well and then hit ENTER. The hand controller will pause for a few seconds while it processes what you told it and if everything is in order you'll see "ALIGN SUCCESS" in the display.
You should now be able to pick sky objects from the list and they will be in the field of view in a low-power eyepiece.
Good Luck with your new scope! If you have questions or need some info you can contact me via email.